ROTO 101
Ink & Ink Filtration
Fourth in a 4 Part Series on Key Elements of the Rotogravure Process
The majority of you have probably seen a presentation from your ink supplier. Most are very informative and well written. If you haven’t yet taken advantage of this valuable resource, I would suggest contacting your ink supplier and having your people sit through one. It’s well worth the effort. Even though I am not a chemist and do not claim to be, I would like to cover the basics of ink construction as it relates to the effect this process element has on your product quality. Because the vast majority of rotogravure printers use solventbased ink, my comments may not relate to water-based ink.
In my experience, water-based inks are not well suited to the rotogravure transfer process. I have visited most gravure printers in North America and have yet to find a water-based gravure printer who isn’t struggling with haze, streaks, and drag-outs. How can they compete with solvent based printers who run faster and run with fewer quality issues?
BACK TO BASICS
Ink is comprised of the following primary ingredients:
- Pigment (color)
- Binder (resin)
- Solvent (carrier)
PIGMENT
Pigment is manufactured by grinding natural rock minerals to extremely small particles. Particle sizes differ based on the mineral color. The following is an example of the initial pigment size achieved in the grinding process (25.4µ = .001”):
- .30µ – Ti02 White
- .25µ – Diarylide Yellow
- .28µ – Lithol Red
- .10µ – Carbon Black
- .26µ – Phthalo Blue
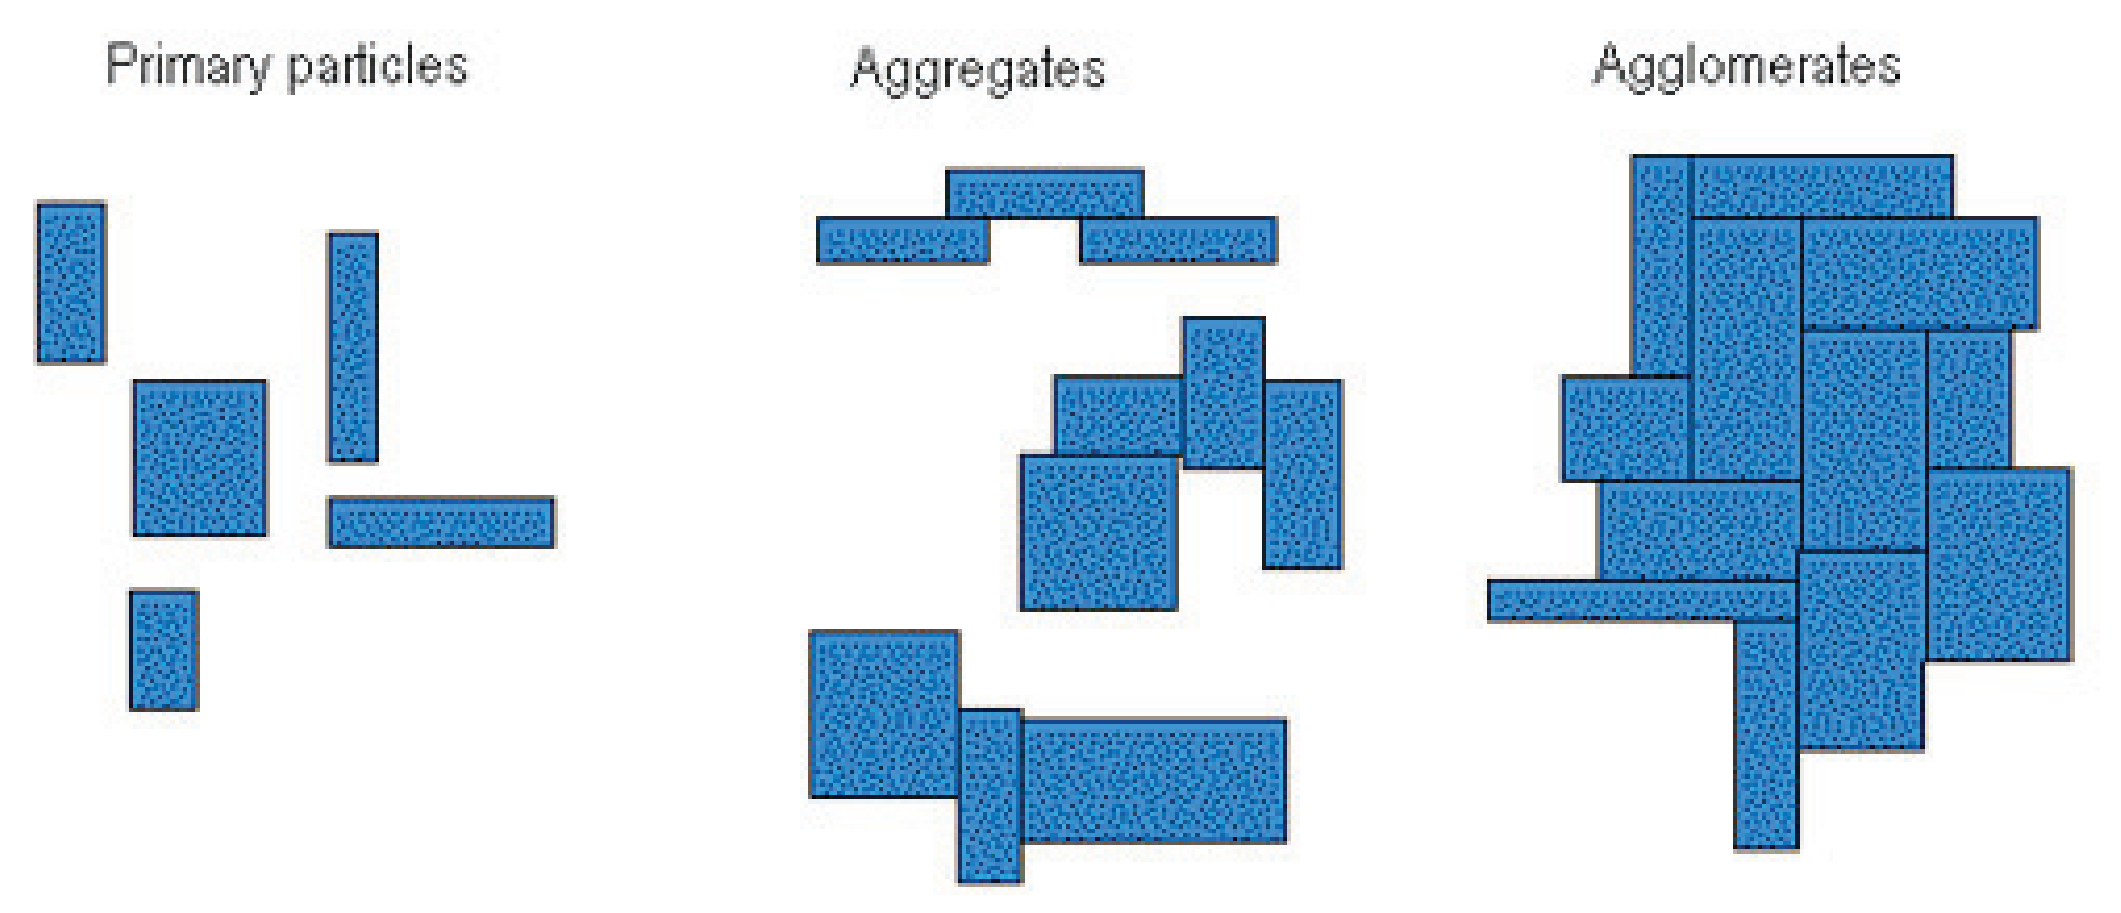
Most pigments are ground in an aqueous media. Following grinding, the water is removed in a drying process during which the small particles tend to join together to form larger particle clusters called “Aggregates” and “Agglomerates.” These particles require shear to break them down into primary particles again (figure 1). Pigments are an INSOLUBLE solid. That means they will not dissolve or remain suspended in a fluid without assistance.
RESIN
As a key ingredient, resin has two primary functions. It coats and helps to suspend or support pigment particles within the carrier, in this case solvent. Once pigment has been transferred and is positioned on the substrate, the resin coating binds the particles to the substrate.As a key ingredient, resin has two primary functions. It coats and helps to suspend or support pigment particles within the carrier, in this case solvent. Once pigment has been transferred and is positioned on the substrate, the resin coating binds the particles to the substrate.
SOLVENT
Solvent (like pH-specific water) is the carrier used to transport the solid pigment particles from the ink pail through the ink delivery and metering system to the substrate. Once the pigment is in place, the solvent carrier is removed by drying. The percentages of solvent and solids as well as the viscosity all impact the suspension, transfer, drying rate, and solvent retention.
The type of solvent used during the manufacturing process depends on the type of resin used (NC, polyamide, vinyl, urethane etc.). True solvents will dissolve resin, but diluents will not. Adding large amounts of diluents will kick out the ink (aggregates/ agglomerates will form). At this point, ink may become unusable. It is extremely important to only use recommended solvents from your ink manufacturer.
Note: Ink that is not stable (too soft resin) will create an issue in printing called “dry” haze, which is different than “wet” haze. The cause of wet haze is more related to blade angles and cylinder polish. Dry haze is the result of a buildup of ink in the RZ of your chrome finish that does not solidify with each revolution through the ink bath. This unsolidified ink will continue to build until it prints. The way to distinguish between the two is whether or not the haze oscillates. Dry haze will not oscillate. Wet haze will.Note: Ink that is not stable (too soft resin) will create an issue in printing called “dry” haze, which is different than “wet” haze. The cause of wet haze is more related to blade angles and cylinder polish. Dry haze is the result of a buildup of ink in the RZ of your chrome finish that does not solidify with each revolution through the ink bath. This unsolidified ink will continue to build until it prints. The way to distinguish between the two is whether or not the haze oscillates. Dry haze will not oscillate. Wet haze will.
BACK TO PIGMENT PARTICLES
It’s the clumping of pigment particles (“Aggregates” and “Agglomerates”) that are an issue for the gravure printer. I have measured some clusters to be as large as several hundred microns. It is these larger particles that lodge under a blade’s edge to cause print defects such as streaks and lines. These particles can also damage the blade’s edge and lead to cylinder damage.
There are a number of things you can do to prevent these particles from becoming an issue in your process. You must first be sure your ink supplier is shearing these particles back to their primary size, refrain from using non-recommended additives, keep ink from freezing (I live in Wisconsin), use only recommended solvents, and make sure you filter inline between your ink pump and printing deck.There are a number of things you can do to prevent these particles from becoming an issue in your process. You must first be sure your ink supplier is shearing these particles back to their primary size, refrain from using non-recommended additives, keep ink from freezing (I live in Wisconsin), use only recommended solvents, and make sure you filter inline between your ink pump and printing deck.
FILTRATION
As the Technical Service Manager for Flxon Inc., I have visited several hundred printers over the last few years. When the printer admits he is having printing issues (i.e., streaks or drag-outs), the first question I have is, “Do you filter?” Most of the time the printer will say, “Yes.” My next question is, “Do you filter properly?” This question always gets the same reaction out of the printer—the deer in the headlights kind of look. Just because you have ink running through a round contraption that says “Filter” on it doesn’t mean you’re filtering adequately. Sometimes the “filter vessel” doesn’t contain a filter.
ADEQUATE FILTRATION
To be effective, a filter must remove all particulate that is large enough to cause print defects. This means any particle that is substantially lager than the average size of all particles should be removed. The hard particles may be pigment, resin or blade debris.
If most particulate in your ink are consistently less than 30µ – 40µ then a particle that is 100µ can be a problem. On the other hand, if all the particulate were consistently 400µ ± 10µ, you would not experience lines and other print defects.
However, consistent large particles will result in a gritty lay down and be more wearing to your cylinder and blades.
Figure 1.
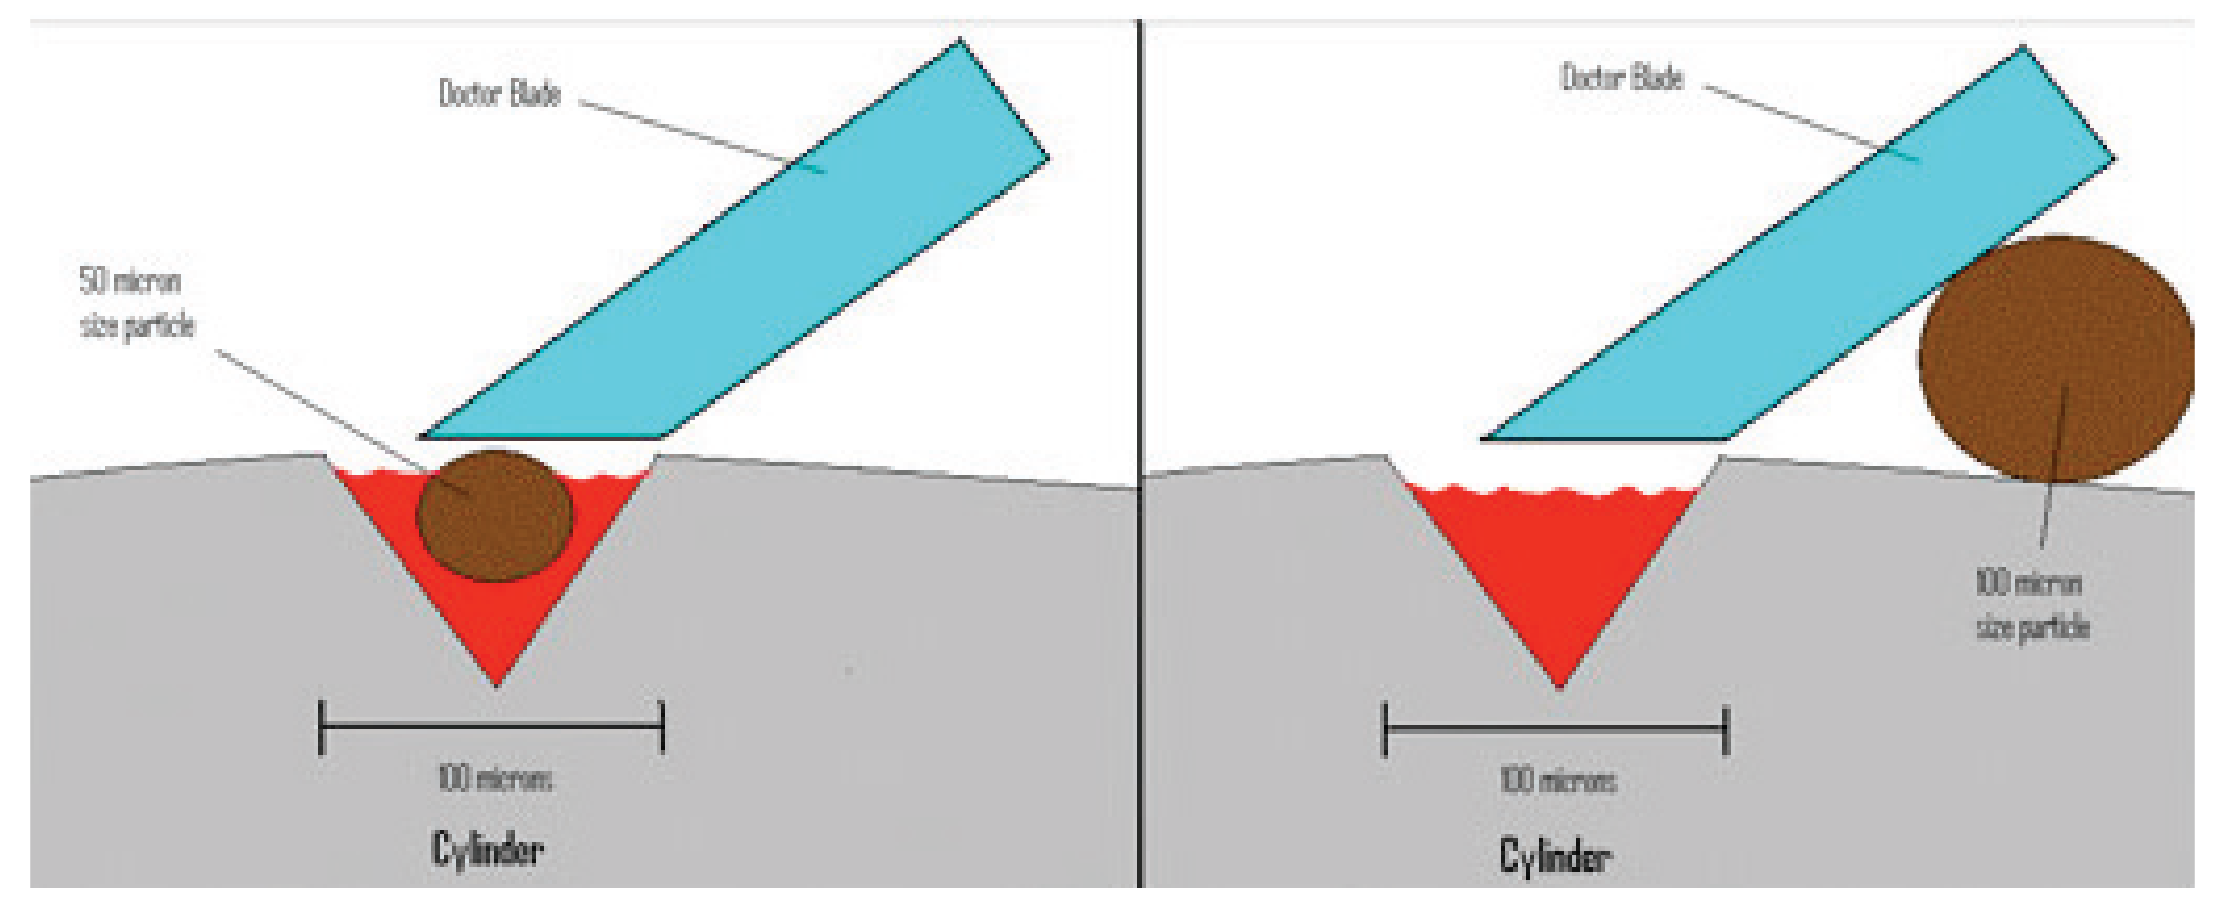
Simply Stated – Size Does Matter!
As shown in figure #2, if the particle is small enough, it can retreat into the cell and not create damage (75µ or smaller). However, if the particle is too large to retreat (75µ or greater), it will create damage in several ways and will cause unique printing defects.As shown in figure #2, if the particle is small enough, it can retreat into the cell and not create damage (75µ or smaller). However, if the particle is too large to retreat (75µ or greater), it will create damage in several ways and will cause unique printing defects.
- Streaks – These are small visible lines that oscillate with the doctor blade. A large particle passes between the doctor blade and the cylinder scoring the contact area of the doctor blade. This occlusion will allow ink to pass that is visible.
- Comets – Relatively short in length and very random. This defect resembles a celestial comet. A large particle will pass between the doctor blade and the cylinder, momentarily lifting the doctor blade, allowing for a large amount of ink to pass. The doctor blade then reseats and begins to wipe.
- Score Lines – Non-oscillating lines in the print. A large particle will sit behind the doctor blade and wear a score line in the chrome finish of the cylinder.
- Drag-outs – Print that is being dragged beyond the trailing edge of the etched cells. Contamination that has accumulated on the tip of the doctor blade that is smearing the print
So, my question to you is, “Do you filter properly?” When I ask this question of printing managers, the response often is:
- We used to filter, but they got clogged and got in the way of our production.
- We don’t need to filter because our ink suppler grinds the pigment to 10µ.
- Some will even claim they have no printing issues (hello!), so filtration is only an added expense.
Here is an industry truth … if you are not filtering your “in-process” ink to at least 100µ (preferably to 50µ), you have particulate related print issues that are costing you money, far more money than the cost of proper filtration.
May I suggest trialing a 50µ filtration system? The majority of your streaks, drag-outs, lines, and comets will disappear. Other printers are doing this and reaping the gains on their bottom lines!
As one of the “Key Elements” of defectfree printing, it is important to keep your ink clean and stabilized to ensure this element does not create issues for you.
Figure 2.
To recap what we have discussed so far in the “Key Elements” series:
- 1. Change is necessary and good.
- 2. Bottom-line profits must be maximized to remain competitive.
- 3. It is important to establish policies/ procedures and train all employees accordingly.
- 4. Everyone must be held accountable (managers, employees, and vendors).
- 5. Cylinder quality is a major key element that must be controlled to reduce process variation.
- 6. Ink must be clean and stabilized to ensure defect-free printing.
If you need help with assessments or training for the best doctor blade solution, contact one of our experts for a consultative evaluation. Our team will be able to help you with solutions.
Download Technical Article
About the Author
Steve Boettcher is a 23-year veteran of rotogravure and no stranger to all facets of the pressroom. For two years Steve fixed presses as a mechanic. He operated a rotogravure press for ten years, and spent eight years at different levels of pressroom management at several major flexible packaging companies including Menasha Corp, Milprint, Alcan, and American Packaging.
For the last three years, Steve has been the Technical Service Manager for FLXON, Inc., a printing-solutions company. His main role has been to educate printers on pressroom efficiencies and the direct relationship doctor-blade quality has on achieving these efficiencies. Steve also performs doctor-blade analysis and is the product manger/designer for the new G-2 product line.
Steve’s goal is to educate every printing manager on the responsibility they have to ensure that the “Key Elements” (Doctor Blades, Ink, Cylinders and Operator practices) of printing are understood and that every vendor is held accountable for delivering consistent, quality products.
